My youngest sister Erin reminded me that my sister Sandy turns seventy this year and suggested we do something special for her. Sandy loves plants and flowers, so a marquetry piece of flowers is in order. I spent some time perusing botanical flower drawings on the internet and came up with half a dozen I liked. The winner is shown below. And my thanks to whomever created this picture. I have two months to complete, finish and frame the piece.
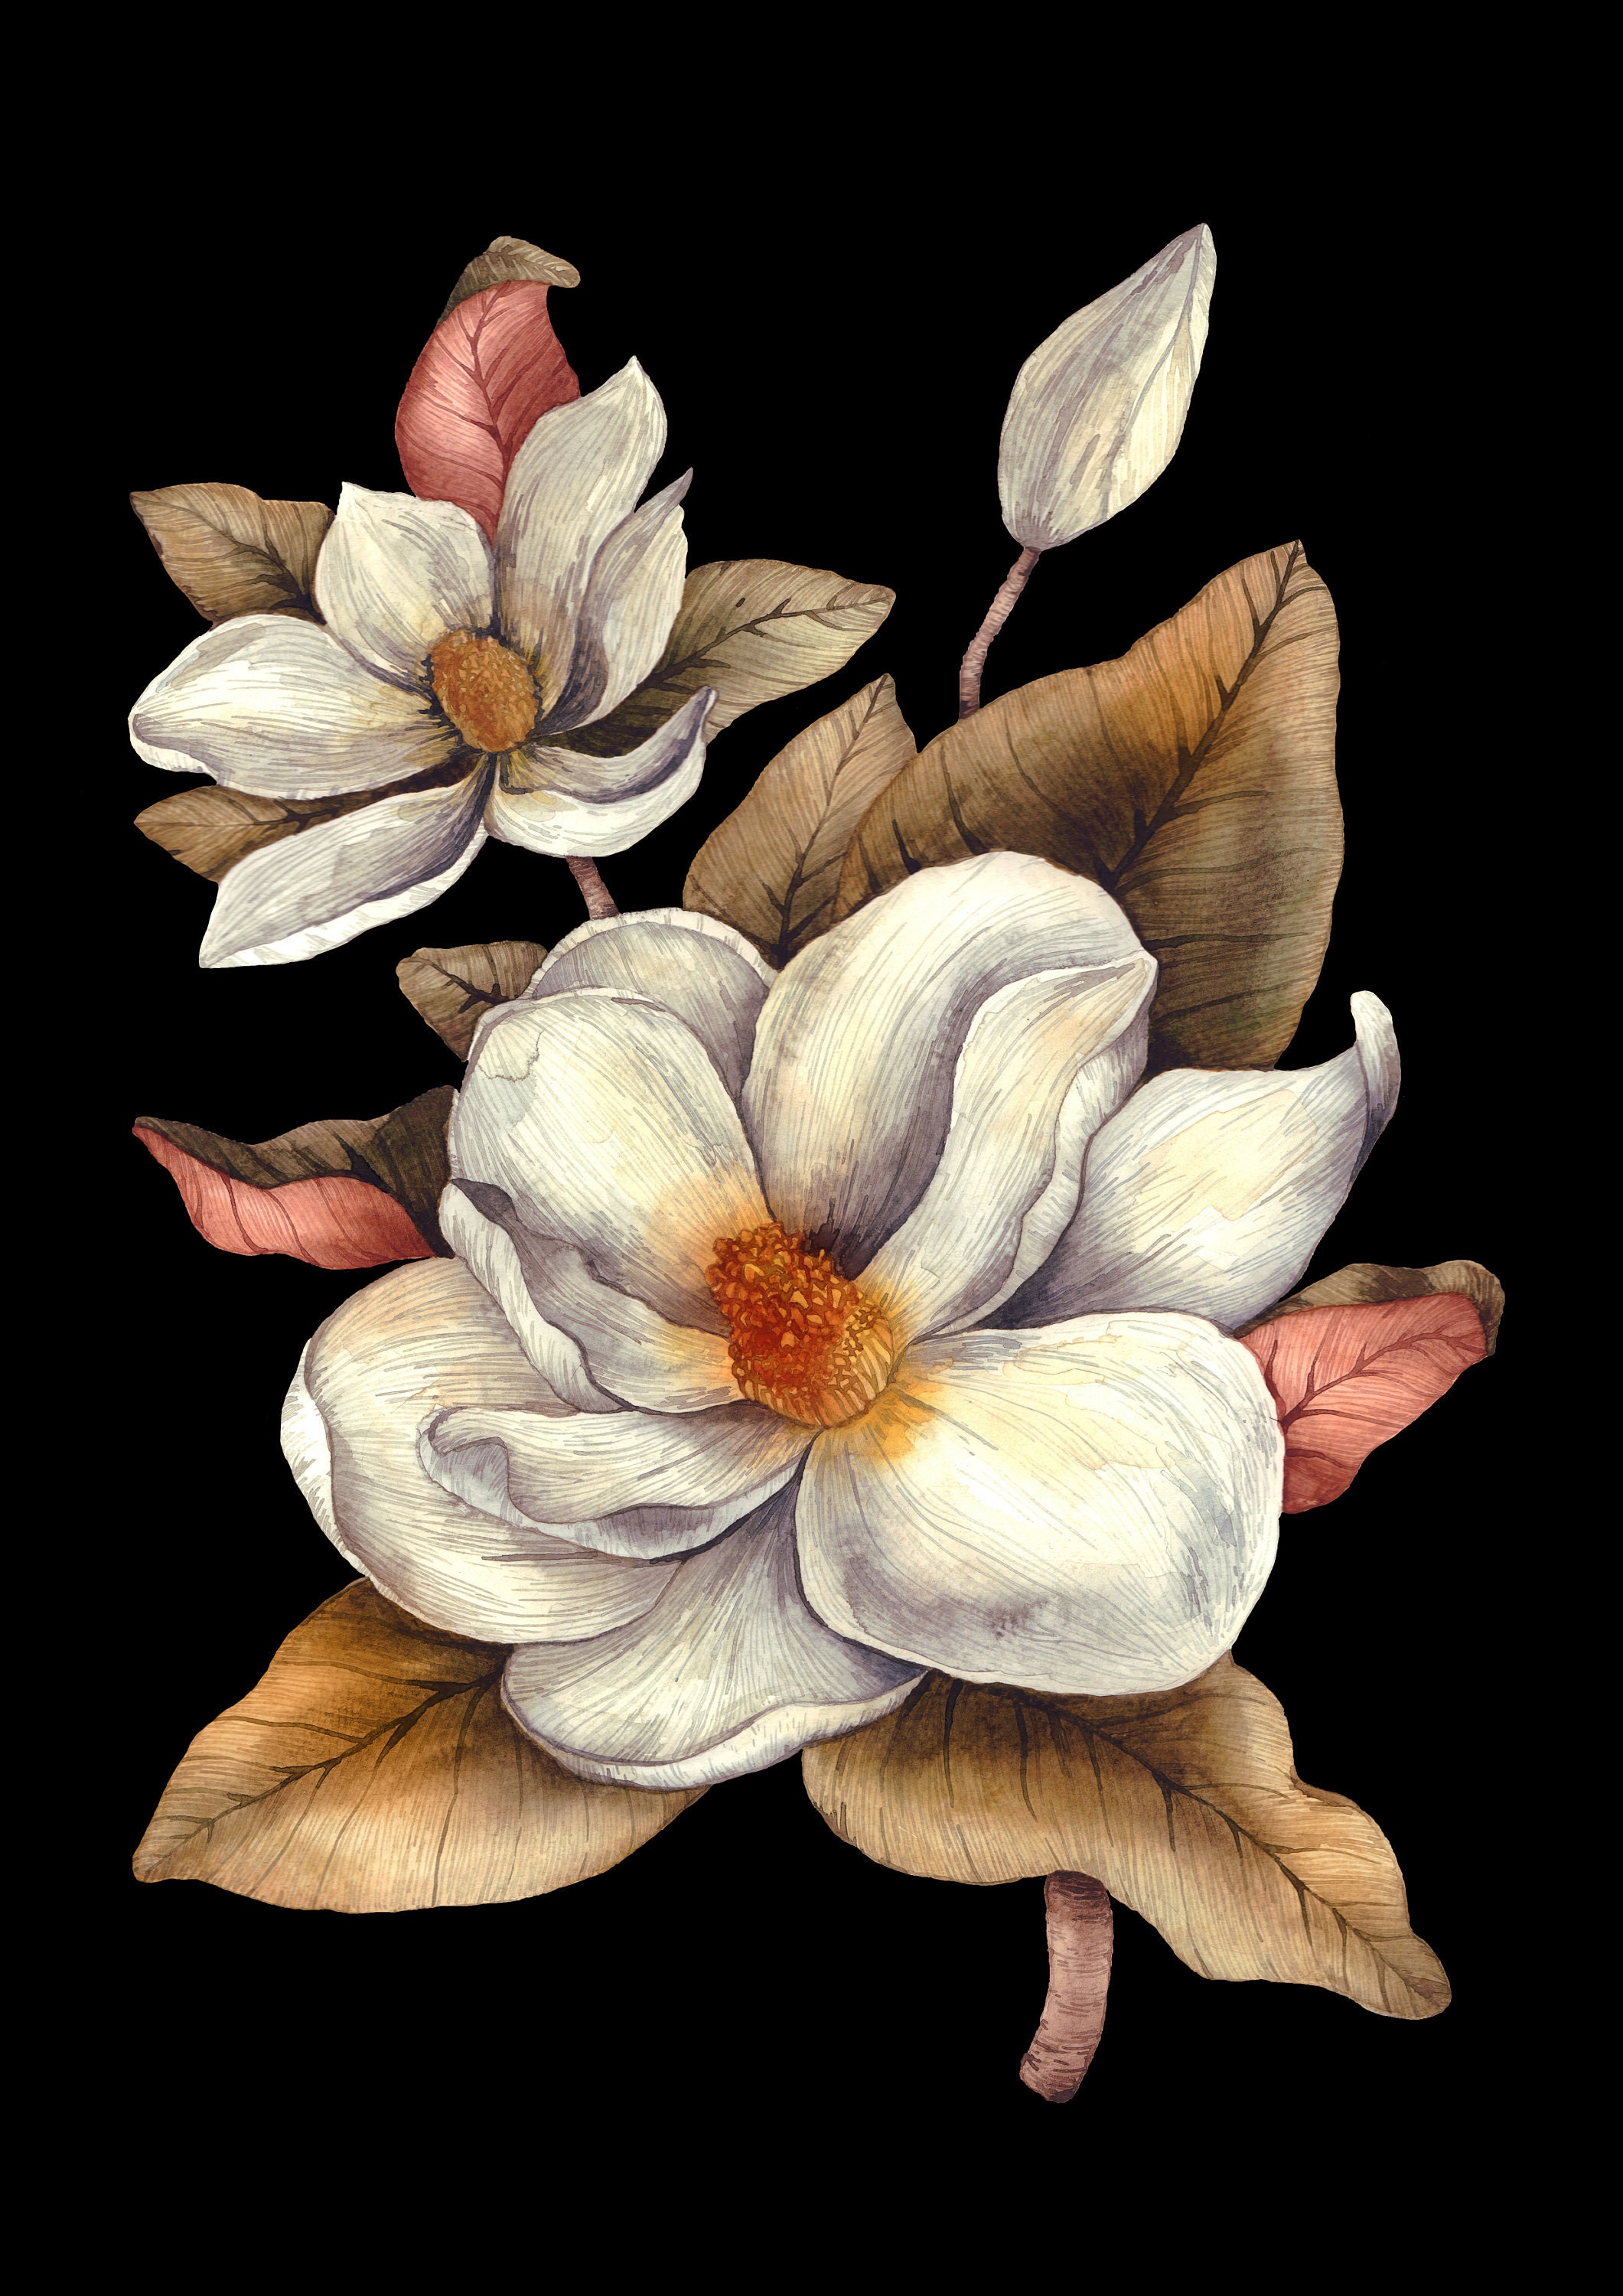
There were a few reasons this picture was chosen over the many other candidates. First, it is a beautiful composition. Second, the colors are readily represented by naturally colored veneers. Third, there are not a lot of fine details, which I struggle to pull off at my skill level in marquetry. The biggest challenges this picture presents is the veining in the leaves and the layering of the leaves and petals. To some extent the veining can be realized with the figuring in the wood and with boundaries between pieces of veneer. A few experiments might be in order. The layering will be managed by judicious choice of packets and order of addition.
There are many shades of color in each petal and leaf. Most of these will be represented with closely matched veneers. The darker shadows will be produced by burning the wood, using the, hot sand in a pan, technique learned at Marc Adams' class on marquetry. I now have a hot plate and can try out this technique at home.
With a picture in hand the next step is defining the areas for different veneers, by outlining them on a printed version of the picture above. A brief attempt was made to outline the colors in a drawing app, but it was more difficult than pencil on a printout. Nine colors or shades of color were selected and areas on the printout demarcated. The picture below shows these regions of color. These nine colors will be supplemented by burning shadows on the appropriate color as needed.

The colors are named as follows:
The picture outline and the outlines of all color regions were traced onto a clean sheet of paper. Four copies of this tracing were made as these will be traced many many times. The tracing is pictured below.

The packets are straightforward to delineate on this project, each leaf and petal will be a packet for over 25 packets. A bigger challenge will be the order of cutting them into the background. The packets are outlined in different colors in the photo below. The stem and the center of the lower flower will also be considered a packet, though the latter has only two parts.

Almost a month later, the dice are done and we have returned from Perdido Key. The stash of veneer was pulled out and nine veneers plus background were selected. There are no gray veneers, so these two colors were replaced with burls. The photo below shows the ten veneers from one to nine. The printed picture is laying on the background veneer.

The second task completed today was visiting Northwest Lumber and purchasing $340 of oak needed for the Stickley floor lamp class the first weekend in May. Later this week the boards will be rough cut to size.
The packets were more clearly defined and labeled. There are four leaf packets on the small flower; numbered by an imaginary clock face at 8, 10, 12, and 3. There are six petal packets on the small flower: 7, 9, 11, 1, 2, and 4. Finally, there is the center of the small flower, though it is only one veneer. The large flower has seven leaf packets: 7, 10, 11, 1, 2, 3, and 4, followed by six petal packets: 7, 8, 10, 1, 3, and 4. That leaves the final three packets: the center packet of the large flower, the stem and the bud.
Work will begin with the simpler packets to get back into a groove and to explore the fragility of the selected veneers. I am hoping to avoid softening the veneer for this project. The relative humidity in the basement is 50%, so my fingers are crossed. The first packets to be tackled are the large flower petal 7, and the small flower leaf 3.
One complication that I need to take into account on most of the leaves is the central spine. I am choosing to fake this spine on the affected leaves by grain direction. These leaves have one veneer that spans the central spine. These will be cut as two pieces on the spine with the grain flaring out. An early trial should clarify whether this will suffice.
Four packets were assembled this afternoon. The usual process was followed. The rearmost segment was chosen and the matching veneer was prepped. The packet was first copied onto the tracing paper and then onto this veneer. A piece of the next veneer was green taped to the first and the design again traced onto it. The appropriate line was noted as well as the direction of the cut so as to keep the top piece to the left of the blade. The two parts were then separated and taped together along the cut line with moistened veneer tape. From above the leaf on the small flower at 3 and the petal on the large flower at 7 were the first two and both went well as shown in the two photos below. Two petals from the small flower were also cut together, 1 and 2. No major fracturing problems were encountered. All four packets were placed under the cutting mat to dry and remain flat.


Yesterday and today more packets were completed. The small flower petals and leaves are all complete. Work is now starting on the large flower. These packets are more complex. For instance the #7 leaf began with two pieces of the same #8 veneer, which were cut together across the stem of the leaf. The bottom two veneers, #7 and #9 were put together before adding them to the combination of the #8 veneers. This packet, upside down, is shown below.

This morning all of the leaves for the large flower were completed, a complex set of packets. In the afternoon the large flower petals were tackled. The goal is to complete all of the packets before this weekend's MASW class to make the Stickley floor lamp.
By the end of Friday after the lamp class all of the flower packets were complete except for the center of the large flower and the stem. These were completed on Saturday. The center of the large flower packet was more thoroughly document in the nine photos below. The photos show the selected veneer for the very center of the flower, the pattern traced onto the veneer, the second piece of veneer to be added, the pattern traced onto the second veneer, arrows showing the direction of cut to leave the new piece on the left side of the saw blade, the two new parts after the first cut, the new piece positioned next to the old, veneer tape to hold the two pieces together, and the third piece taped, traced and ready for cutting.


With the center from above completed and the lower stem completed all of the packets are now done. The photo below shows all twenty-seven of the packets in an approximation of their final position in the picture. What a lovely flower!!

It is Mother's Day and time to consider cutting the packets into the background veneer. The background veneer is quite fragile, wavy and needs to be softened prior to cutting. Two pieces were cut each approximately 9" X 11". These were sprayed with commercial veneer softener on both sides. (Yes, I am giving it another try.) The liquid was clearly soaking through the material as there were many spots when turning it around to spray the second side. After letting the excess drain off the veneer was placed between plywood cauls. The order of packing was: plywood, two shop towels, screen, veneer, screen, two shop towels, screen, veneer, screen, two shop towels, and plywood. The whole was place in the vacuum press at 10 am. Surprisingly, the press holds vacuum for over two and one half minutes!
The veneer came out flat and relatively soft! This softening is not supposed to last for more than a few days, so cutting the packets into the background needs to begin. The first addition will be the bud and its stem—good practice. The small flower will be the second target and needs to be assembled prior to cutting in to the background. The first priority for adding the flower is setting the order of additions. The rearmost packets are the stem and the four leaves, none of which overlap each other. The petals do have some overlap and overlap the leaves and stem, so will be tackled before the leaves in the following order: 7, 9, 11, 1, 2, and 4, followed by the flower's stem.
The process begins by tracing a new upper flower from the magnolia onto tracing paper. A piece of the #1 veneer had the flower's center traced on it. (Crosshairs were also added and repeated as needed to align the tracing paper, growing flower and new bits.) The petals and then the leaves were sequentially added to this central bit, the petals in the order shown above and the leaves also in a clockwise order starting from 9 o'clock. The resulting flower is shown below.

A similar path was followed for the large flower. With the petals added mostly in clockwise order except for two at 2 and 7 o'clock added in after the first four. A photo of the large flower sans leaves is shown below. The leaves will be added tomorrow and followed by cutting into the background. The leaves were added with only two added in a certain order, 2 and 1 o'clock. The stem was also added completing the flower seen in the second photo below.


Yet another sheet of transfer was graced with the magnolia flowers. Two crosshairs were put on the tracing paper as well. The drawing was transfered to the background veneer, along with the crosshairs. The bud was aligned with the drawing on the veneer and taped in place. A hole was punched at the bottom corner of the stem, buried in the yet to be added large flower. The blade was run through the hole and then the bud was cut. It popped tightly into place as shown in the photo below and then taped with veneer tape.

The small flower was also cut in starting with a similar hole in the stem's extension. Two pieces of the flower's veneer came loose and had to be glued into place. Another nice tight fit. With all of the wet veneer tape the background veneer started to curl, so it was placed under the cutting mat to dry, while being pressed flat. Below is a photo of the small flower after drying. (The bit of background chipout will be lost when the large flower is put in place.)

The large flower was cut in last. What a long intense cut! There was one leaf petal that got a little messed up when I lost the line, but it is not really noticeable. The two pictures below show the two faces of the final product. Beyond a few repairs the marquetry is complete! Need to celebrate tonight!


Spent an hour or so repairing tearouts in the veneer. There are still a few holes remaining, but are too tiny to fix with bits of veneer. These will be fixed after glue-up with sawdust if needed. The marquetry tools were put away and a fine tooth blade installed in the table saw. A 9" X 11" rectangle of 1/4" plywood was cut using the crosscut sled. A 9" X 11 1/4" piece of the "backing" veneer was cut off and the backing veneer was rewapped and put away. The veneer and backer board are seen in the photo below. Glue was spread on the backer board. The veneer was applied and the package was placed in the vacuum press for three hours.

The vacuum press was unsealed and the veneered backing was removed. The excess veneer was cut off of the edges. The opposite side of the backing was covered with glue and the marquetry was placed on the backing, veneer tape exposed. This stack was returned to the vacuum press for three hours, marquetry side down. The photo shows the air pressing and the glue drying. The second photo shows the "good" side after three hours in the press


Scraping was done this morning, a lot of scraping. After much work with little reward, I realized how important flexing the scraper was to success. The scraping then proceeded much more efficiently. After scraping >90% of the paper off both sides of the panel were sanded. The back side, which had some glue scraped off, was sanded from 120 to 220 grit. The front was sanded with 150 followed by 220 grit. Dust was blown off with canned air. The back was signed. The pictures below record this sequence of activities.


The oak molding left over from the Banner marquetry project is a few inches too short to make a frame, so back to Menards. More oak molding was purchased along with tools for the Hammered Copper Mantle Clock class at MASW next week. Turns out the molding on hand was sufficient for the task. The jig was used to cut the four pieces of the frame. The glue-up jig was then used to properly align the sides during gluing as seen in the photo below. The second photo shows the picture in the frame after the glue had dried for an hour.


Using the spline jig, the spline cuts were made across the corners of the frame. A strip of 1/8" X 3/4" of walnut was cut from a scrap. Some sanding was required before it fit in the cuts. This strip was cut into four 1 5/16" long splines. These splines were glued into the corner cuts and left to dry. The excess was cut off and the remainder sanded flush. One corner chipped out and was repaired.
The repair job was cleaned up and the entire frame was sanded with 220 grit sandpaper by hand. Dust was blown off of the frame in preparation for painting. The frame and picture were painted with lacquer using a brush. The first of three coats went on at 8:15 and was followed by two more coats each after a two hour drying time. The photo below shows the lacquered picture sitting in the lacquered frame, but not yet attached. The picture was attached with two small brass screws and two #6 washers. A picture was installed on the top of the frame.
